SFDC004 — Xtrm Payments for Salesforce: Setup Guide
Last updated: October 13, 2026
TL;DR
Setup takes about 15 minutes and happens in two systems: the Xtrm platform first (Part 1), then Salesforce (Part 2). Purple screenshot labels mean the Xtrm platform. Blue labels mean Salesforce.
In the Xtrm platform: copy the Client ID, Secret Key and API Account # (gear icon, Integrations, API tab), get API access approved for Salesforce, and fund the wallet you'll pay from. Funding happens in the Xtrm platform, not in Salesforce.
In Salesforce: assign the Xtrm permission sets, paste the three values into the Xtrm app's Connect sub-tab (the Secret Key goes in Client Secret), choose the Xtrm wallet that pays and the send mode, and check that the Retry Payment button is on the payment page. Adding the Create Xtrm Payment button to Contacts and Accounts is optional.
Finish with a 1.00 test payment and check that its status reaches Completed.
Before you start
Follow these steps after you install Xtrm Payments for Salesforce (SFDC003) to connect your Salesforce org to your Xtrm account and make your first payment. If it isn't installed yet, use the install link; SFDC003 has the steps, including how to install in a sandbox. Setup takes about 15 minutes. You need a Salesforce user with the System Administrator profile and a login to your Xtrm account that can open Integrations. This guide covers version 1.12 of the package.
Where each step happens
Setup happens in two separate systems. Every part and step below says which one you are in, and every screenshot has a label strip across the top: purple for the Xtrm platform, blue for Salesforce.
System | What it is | What you do there |
|---|---|---|
Xtrm platform | Your Xtrm account on the web, where your organization's wallets, users and API credentials live. The Xtrm app in Salesforce calls it your "Xtrm portal". | Part 1: copy your API credentials, get API access approved for Salesforce, and fund the wallet you'll pay from. Funding happens here, not in Salesforce. |
Salesforce | Your Salesforce org: Setup, plus the Xtrm app this package installs, with its tabs Xtrm Payments Workspace, Xtrm Logs and Xtrm Configuration. | Part 2: Steps 1 to 9. |
Anything named "Xtrm" inside Salesforce, such as the Xtrm app, the Xtrm Configuration tab and the Xtrm permission sets, is part of the Salesforce package. It is not the Xtrm platform.
Part 1. In the Xtrm platform
Where: the Xtrm platform. Log in with your Xtrm account.
Copy your API credentials
You paste these three values into Salesforce in Step 3.
Log in to the Xtrm platform.
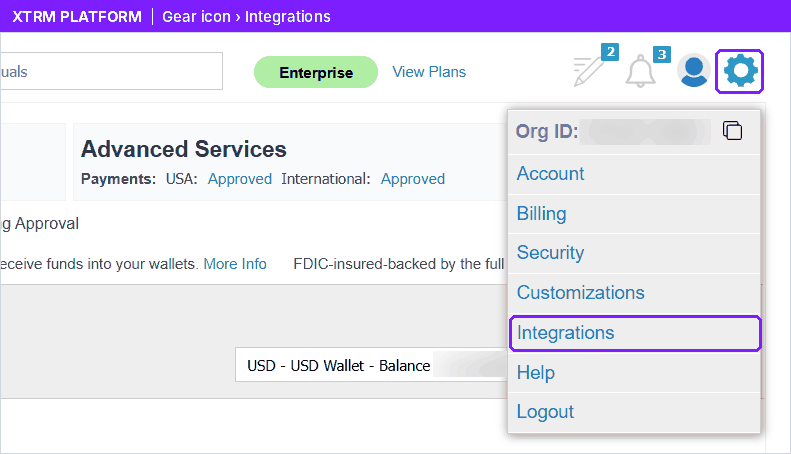
Click the gear icon (top right), then Integrations.
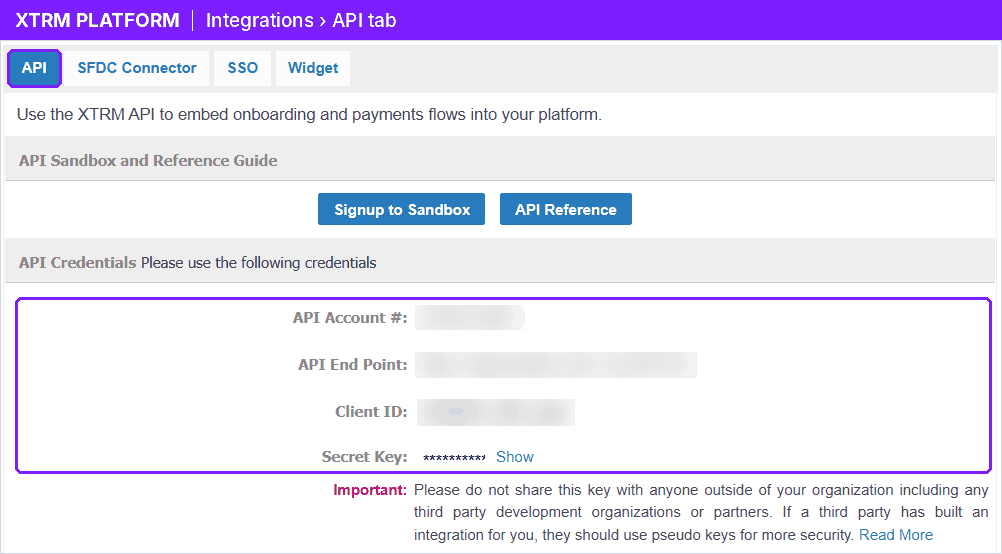
On the API tab, under API Credentials, copy:
Client ID
Secret Key (click Show to reveal it)
API Account #, your Xtrm account number. It starts with
SPN.
Keep the Secret Key private. Paste it only into the Client Secret field in Salesforce (Step 3). Once it is saved in Salesforce, no one can read it back, including through Salesforce Setup, reports or the API.
Your Xtrm account number also shows in the Xtrm platform under Organization in the left menu, next to your company name. See COMPANY028 for more on finding it.
IP Whitelisting: When you request IP whitelisting for Salesforce in the Xtrm platform (see Get API access approved for Salesforce, below), request it for both web and mobile: set Application Type to Web and Mobile or Mobile Only.
Get API access approved for Salesforce
Xtrm's API only accepts calls from servers Xtrm has approved, and the Xtrm app makes its calls from Salesforce's servers. If your Xtrm account isn't set up for this yet, request it in the Xtrm platform, or ask your Xtrm Account Manager. Do this before Step 3.
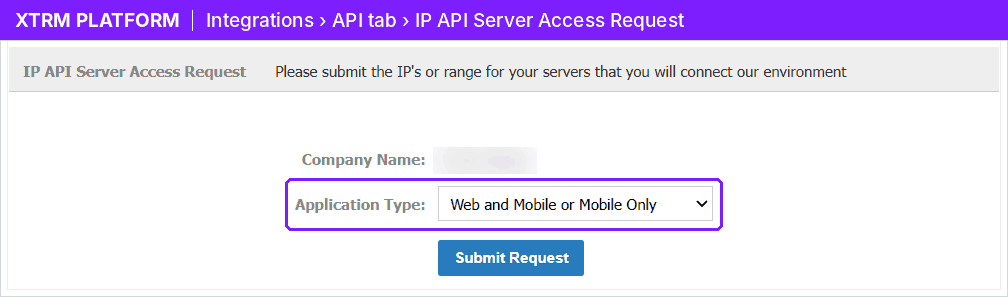
Scroll to the bottom of the same API tab, to IP API Server Access Request.
Set Application Type to Web and Mobile or Mobile Only.
Click Submit Request.
Fund the wallet you'll pay from
Every payment made from Salesforce is paid from one Xtrm wallet, which you choose in Step 4. Funding that wallet happens here in the Xtrm platform, not in Salesforce.
Fund the wallet before the test payment in Step 9, and keep enough money in it for the payments your team makes. FUND001 - How to Fund Company Wallets covers the ways to fund a wallet.
Part 2. In Salesforce
Everything from here on happens in Salesforce, logged in as a user with the System Administrator profile. You won't need the Xtrm platform again during setup.
Step 1. Give users access
Where: Salesforce Setup.
Assign a permission set to everyone who will use the Xtrm app in Salesforce, including yourself:
Permission set | Give it to |
|---|---|
Xtrm Admin | Salesforce admins who connect the app to Xtrm and manage its settings |
Xtrm Payment User | Salesforce users who create payments, including integration and data load users |
Go to Setup → Permission Sets.
Click the permission set, then Manage Assignments → Add Assignment.
Select the users and click Assign.
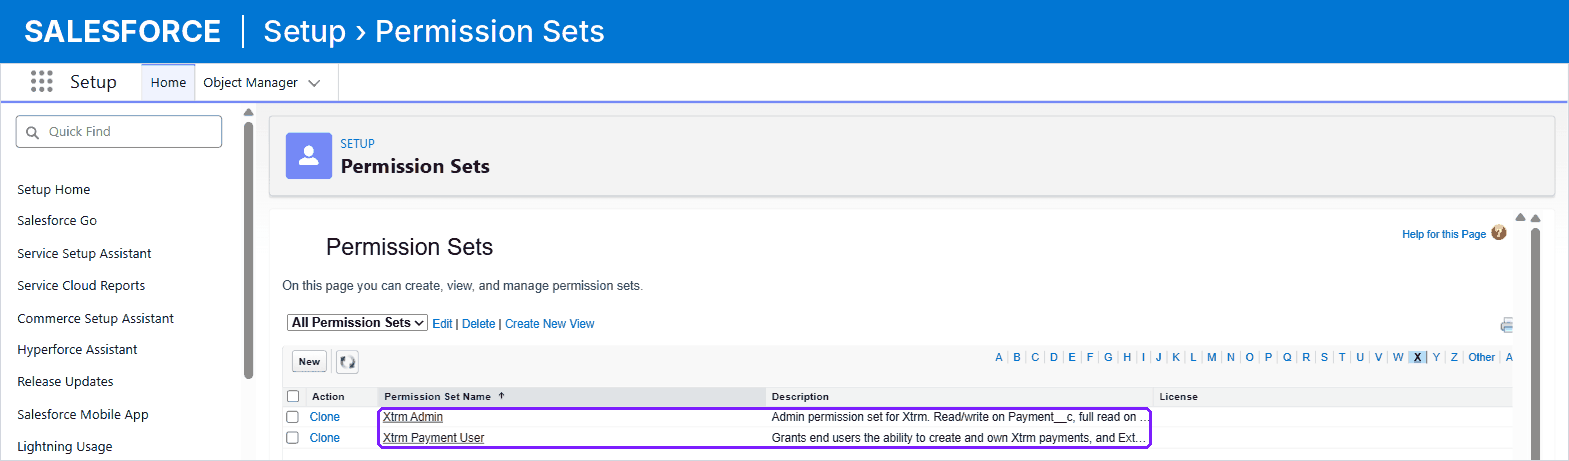
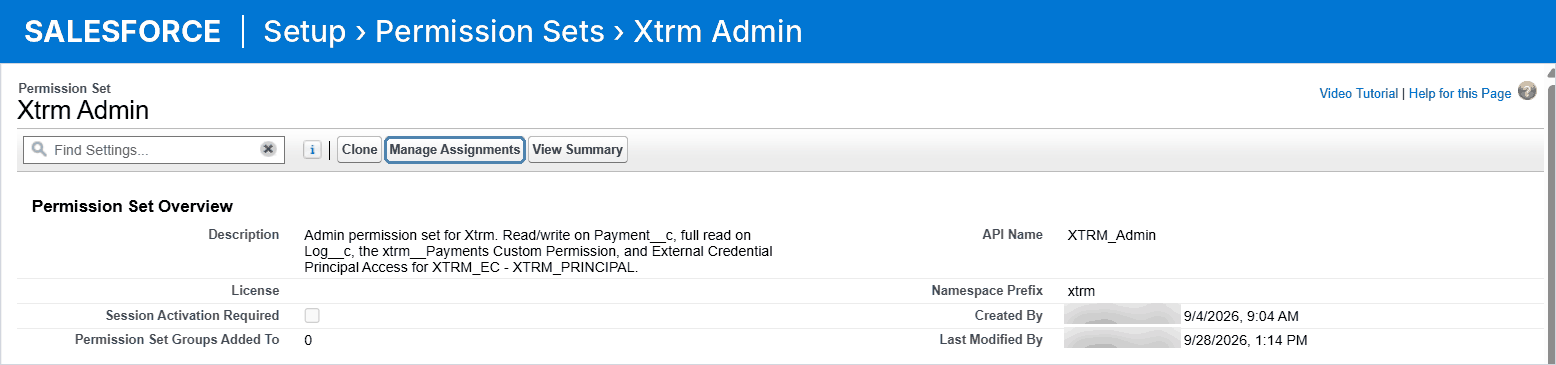
Assign Xtrm Admin to yourself before you continue. A payment only goes out if the Salesforce user who creates it has one of these two permission sets. These permission sets control access in Salesforce only. They don't add anyone to your Xtrm account.
Step 2. Open the Xtrm app
Where: Salesforce, App Launcher.
Open the App Launcher (the grid icon, top left), search for Xtrm, and open the Xtrm app. This is the app the package installed in Salesforce. It has three tabs:
Xtrm Payments Workspace, where your team creates and tracks payments
Xtrm Logs, a record of every call Salesforce makes to Xtrm
Xtrm Configuration, the app's admin settings
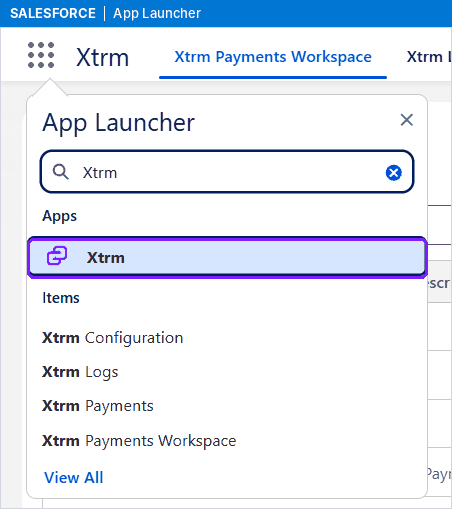
Step 3. Connect Salesforce to your Xtrm account
Where: Salesforce, Xtrm app, Xtrm Configuration tab, Connect sub-tab. You paste in the three values you copied from the Xtrm platform in Part 1.
The fields have different names in Salesforce:
Copied from the Xtrm platform (Integrations, API tab) | Paste into Salesforce (Xtrm Configuration, Connect) |
|---|---|
Client ID | Client ID |
Secret Key | Client Secret |
API Account # (starts with SPN) | Issuer Account Number (SPN) |
Open the Xtrm Configuration tab. You land on the Connect sub-tab.
Paste each value into its field, as in the table above.
Check the Characters captured count under Client Secret. It should match the length of the Secret Key in the Xtrm platform, which confirms the whole key was pasted.
Click Save & Connect.
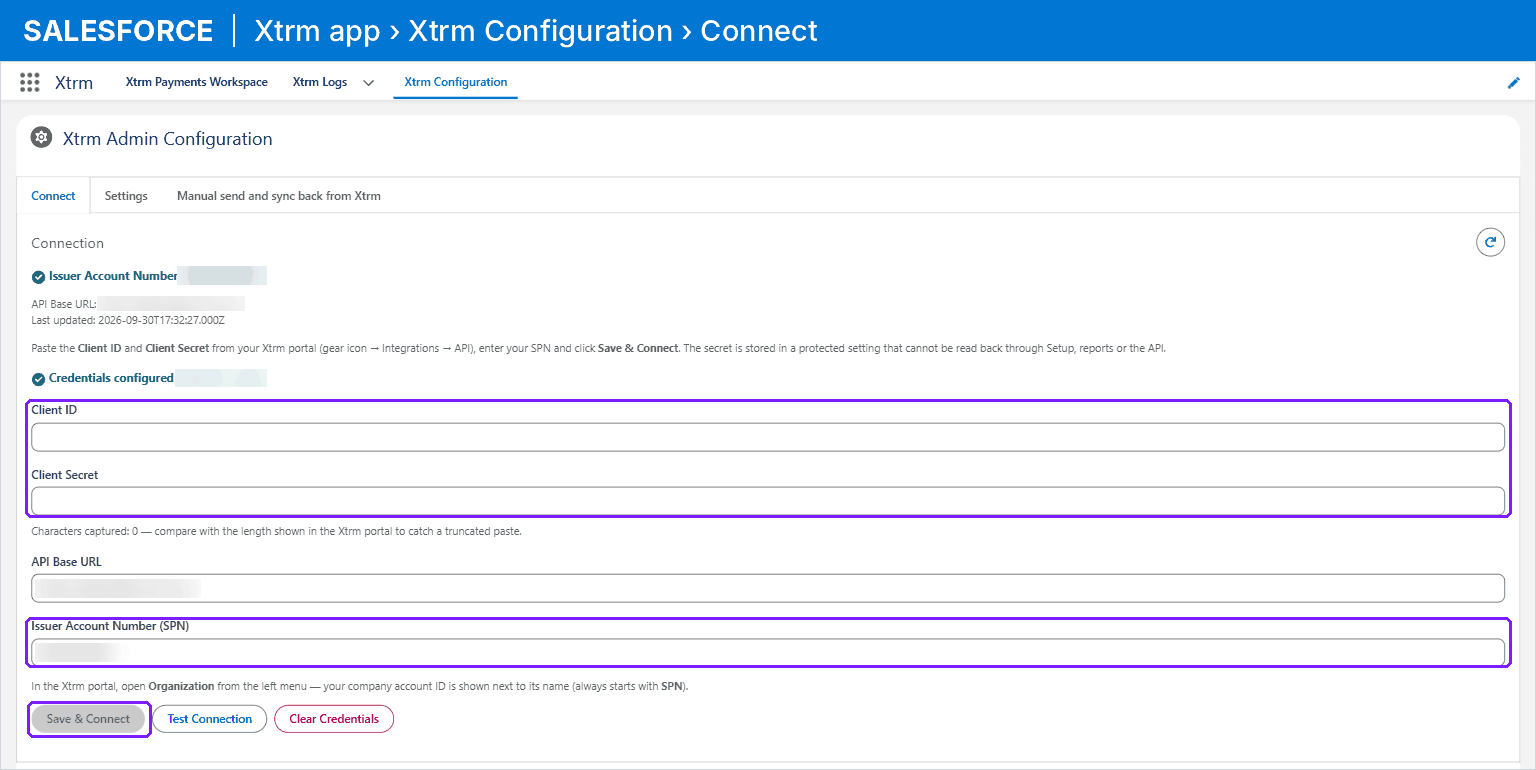
When the connection works, the Connection panel at the top of the Connect sub-tab shows a green check next to Issuer Account Number and Credentials configured. If you see an error instead, go back to the Xtrm platform, copy the Client ID and Secret Key again, and paste them in. A wrong or incomplete key is the usual cause. If the keys are right and it still fails, check that Xtrm has approved API access for Salesforce (Part 1).
API Base URL, on the same sub-tab, is the address of Xtrm's API that Salesforce calls. For a live Xtrm account it is https://xapi.xtrm.com. To test against an Xtrm sandbox account instead: in Salesforce, create an Xtrm Feature Flag record named Allow_Base_Url_Override (the steps are under Pause sending below), enter https://xapisandbox.xtrm.com as the API Base URL, and click Save & Connect with the credentials from your Xtrm sandbox account.
You can click Test Connection at any time to check the connection. To change credentials later, copy the new values from the Xtrm platform, paste them here, and click Save & Connect again.
Step 4. Choose the Xtrm wallet that pays
Where: Salesforce, Xtrm app, Xtrm Configuration tab, Settings sub-tab.
Open the Settings sub-tab. It lists the wallets in your Xtrm account, with balances, read from the Xtrm platform.
Select the wallet that should fund payments and click Set as Default Source Wallet. The wallet gets a Default label.
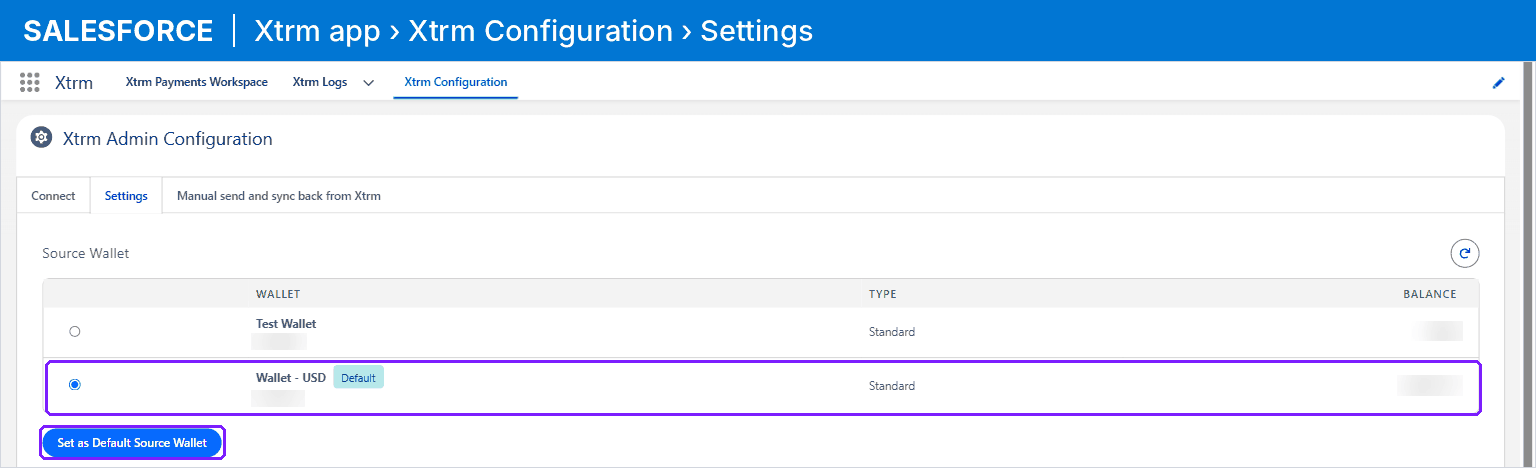
Every payment made from Salesforce is paid from this Xtrm wallet, in the wallet's currency. The payment form picks that currency for you, and a payment in any other currency is stopped before it is sent.
This sub-tab shows the wallet's balance, but it can't add money to the wallet. To add money, fund the wallet in the Xtrm platform (see Fund the wallet you'll pay from, in Part 1).
Step 5. Choose how payments are sent
Where: Salesforce, Xtrm app, Xtrm Configuration tab, Settings sub-tab.
Under Payment Automation, pick a Send mode and click Save Send Mode. The send mode controls when Salesforce sends payments to Xtrm:
Immediate (recommended): Salesforce sends each payment to Xtrm as soon as it is created, and its status updates on its own over the next few minutes. Nothing else to set up. When 50 or more payments are created at once, they run as a batch job.
Scheduled: payments wait in Salesforce as Pending and go to Xtrm together on a schedule. Under Scheduled Jobs, schedule both Send Payment and Payment Status Poller: pick a Frequency and a Starting time (UTC), then click Schedule.
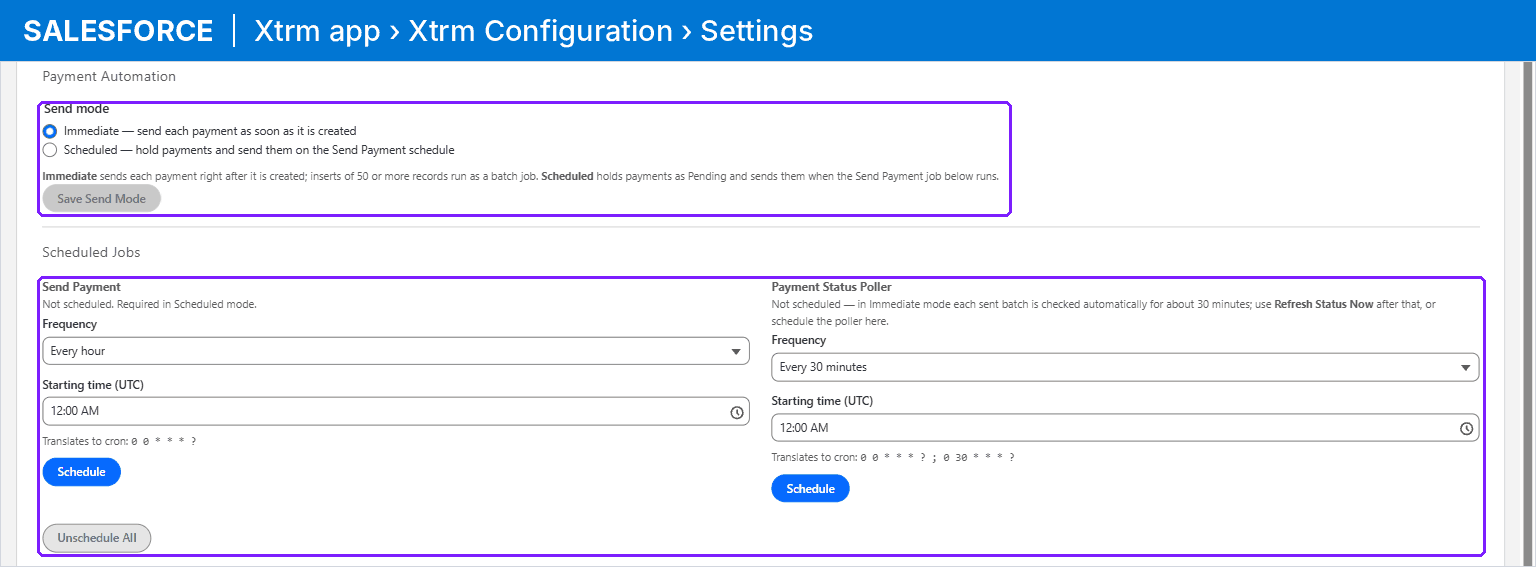
If Flows or integrations create payments: also schedule Send Payment (hourly is fine) in Immediate mode. It picks up any payment that could not be sent straight away, for example one created by a Flow running as the Automated Process user.
In Immediate mode, Salesforce checks each sent batch with Xtrm for status updates automatically for about 30 minutes. After that, use Refresh Status Now, or schedule the Payment Status Poller. Unschedule All removes the scheduled jobs.
Step 6. Add the Create Xtrm Payment button to Contacts and Accounts (optional)
Where: Salesforce: a Contact or Account record (Edit Page), or Setup, Object Manager.
This lets users start a payment straight from a Contact or Account record in Salesforce. It's optional: payments can always be created from Xtrm Payments Workspace. The button comes with the package, but Salesforce doesn't let a package change your page layouts, so you add it yourself.
Repeat these steps for Contact and then Account:
Open any Contact record, click the gear icon (top right), then Edit Page.
Click the header at the top of the page, the Highlights Panel with the record name and buttons.
If the panel on the right shows Add Action, click it, find Create Xtrm Payment, select it and click Done. Click Save, and activate the page if asked.
If the panel says the actions come from the page layout instead, add the button to the layout:
Go to Setup → Object Manager → Contact → Page Layouts and open the layout your users see.
In the palette at the top, click Mobile & Lightning Actions.
Drag Create Xtrm Payment into the Salesforce Mobile and Lightning Experience Actions section. If the section shows a message about predefined actions, click the link in it to override them first.
Click Save. Repeat for any other layouts your users are assigned.
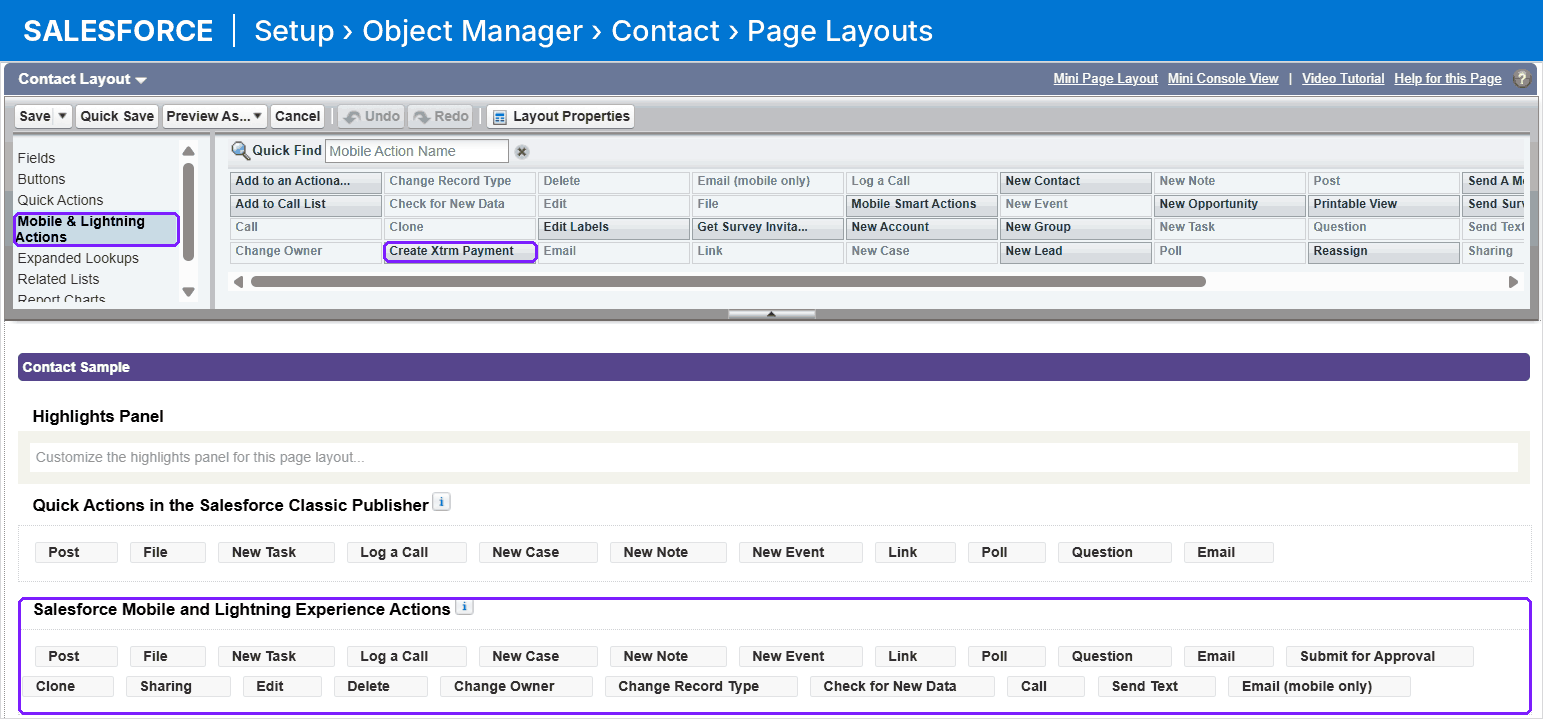
The button then shows at the top of the Contact or Account record.

Step 7. Check the payment page
Where: Salesforce Setup, Object Manager.
Go to Setup → Object Manager → Xtrm Payment → Lightning Record Pages.
Check that Payment Record Page is marked Org Default.
If it is not, open it, click Activation, assign it as the Org Default, and save.
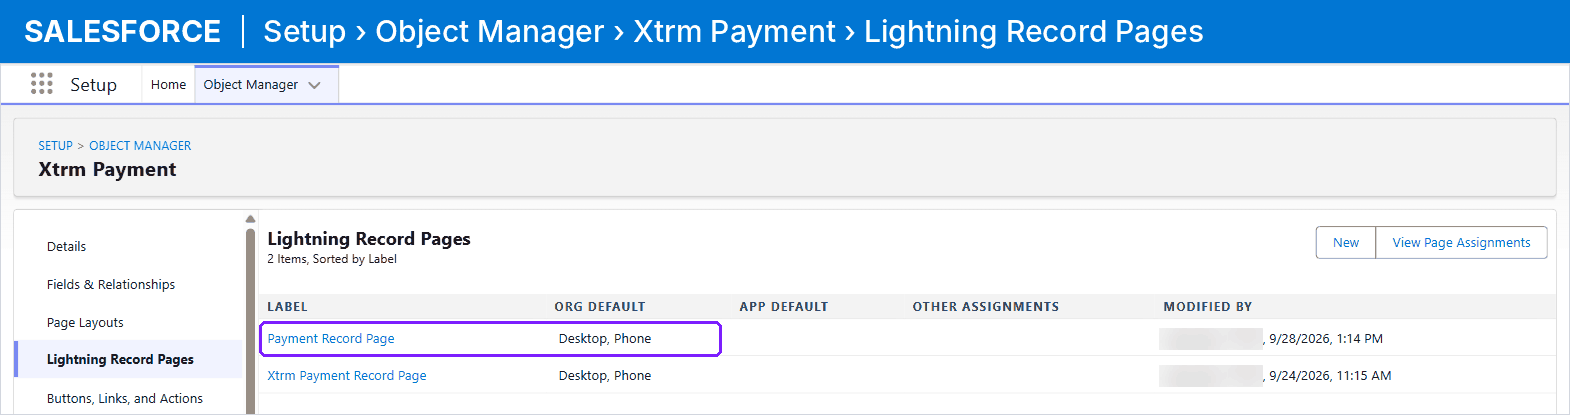
Then check that the Retry Payment button is on the payment page. Users need it to retry a failed payment.
Go to Setup → Object Manager → Xtrm Payment → Page Layouts and open Payment Layout.
Look for Retry Payment in the Salesforce Mobile and Lightning Experience Actions section. If it's there, nothing else to do.
If it's missing, click Mobile & Lightning Actions in the palette and drag Retry Payment into the section. If the section shows a message about predefined actions, click the link in it to override them first. Click Save.
Step 8. Allow CSV import (optional)
Where: Salesforce: the Xtrm Payments Workspace tab and Setup (Data Import Wizard).
You can load many payments into Salesforce at once from a CSV file. This uses Salesforce's own Data Import Wizard, the standard import tool built into every Salesforce org. Xtrm doesn't add an importer of its own.
On Xtrm Payments Workspace, pick a list view with no payments in it (for example Pending) and click Export CSV. The file has the column headers only and is your import template.
Fill in one row per payment. Every row needs Recipient Type (
PersonalorCompany), first and last name, email, Recipient Country (ISO2) (two letters, for exampleUS), Amount and Send Method (XTR94502for a person's wallet,XTR94504for a company's wallet,XTR94500for a bank transfer). Company rows also need Recipient Name (the company name). Currency must match your source wallet's currency (Step 4). If the recipient already has an Xtrm account, you can enter their Xtrm account number in Recipient Id instead of the name and email.Go to Setup → Data Import Wizard → Launch Wizard → Custom objects → Xtrm Payments → Add new records, upload the file and start the import.
Rows missing required values are rejected with a message saying what is missing.
In Immediate mode, imported payments go to Xtrm as soon as the import runs. To check them first, pause sending before you import (see Pause sending).
The Import CSV button on the workspace opens the Data Import Wizard directly. It only appears for users with the Import Custom Objects permission. System Administrators have it; to give it to others, add it to a permission set of your own.
Step 9. Make a test payment
Where: Salesforce, Xtrm app, Xtrm Payments Workspace tab.
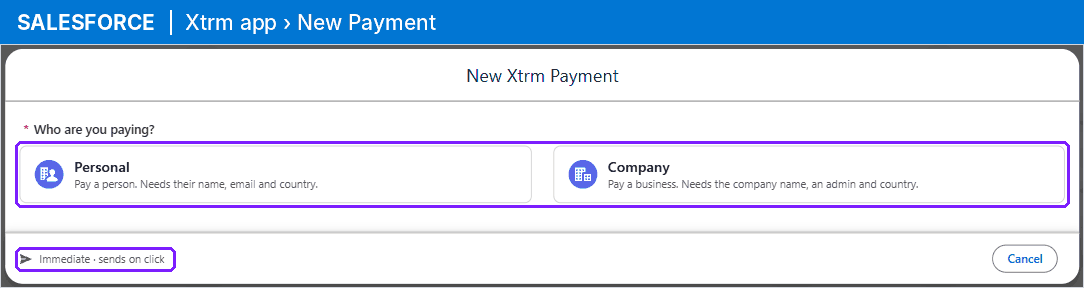
Open Xtrm Payments Workspace and click New Payment.
Under Who are you paying? choose Personal.
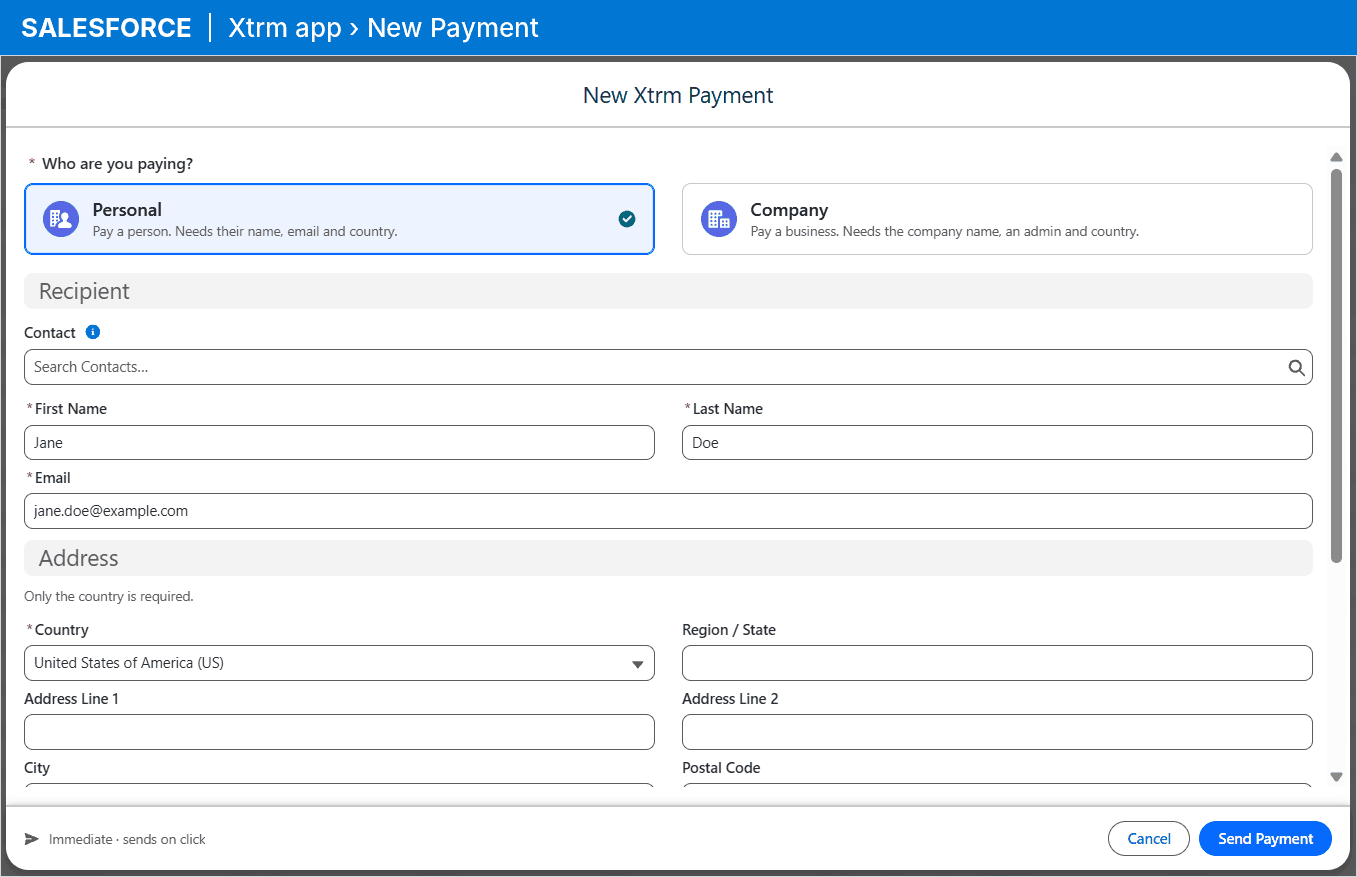
Enter the recipient's First Name, Last Name, Email and Country. The recipient doesn't need an Xtrm account; Xtrm creates one for them.
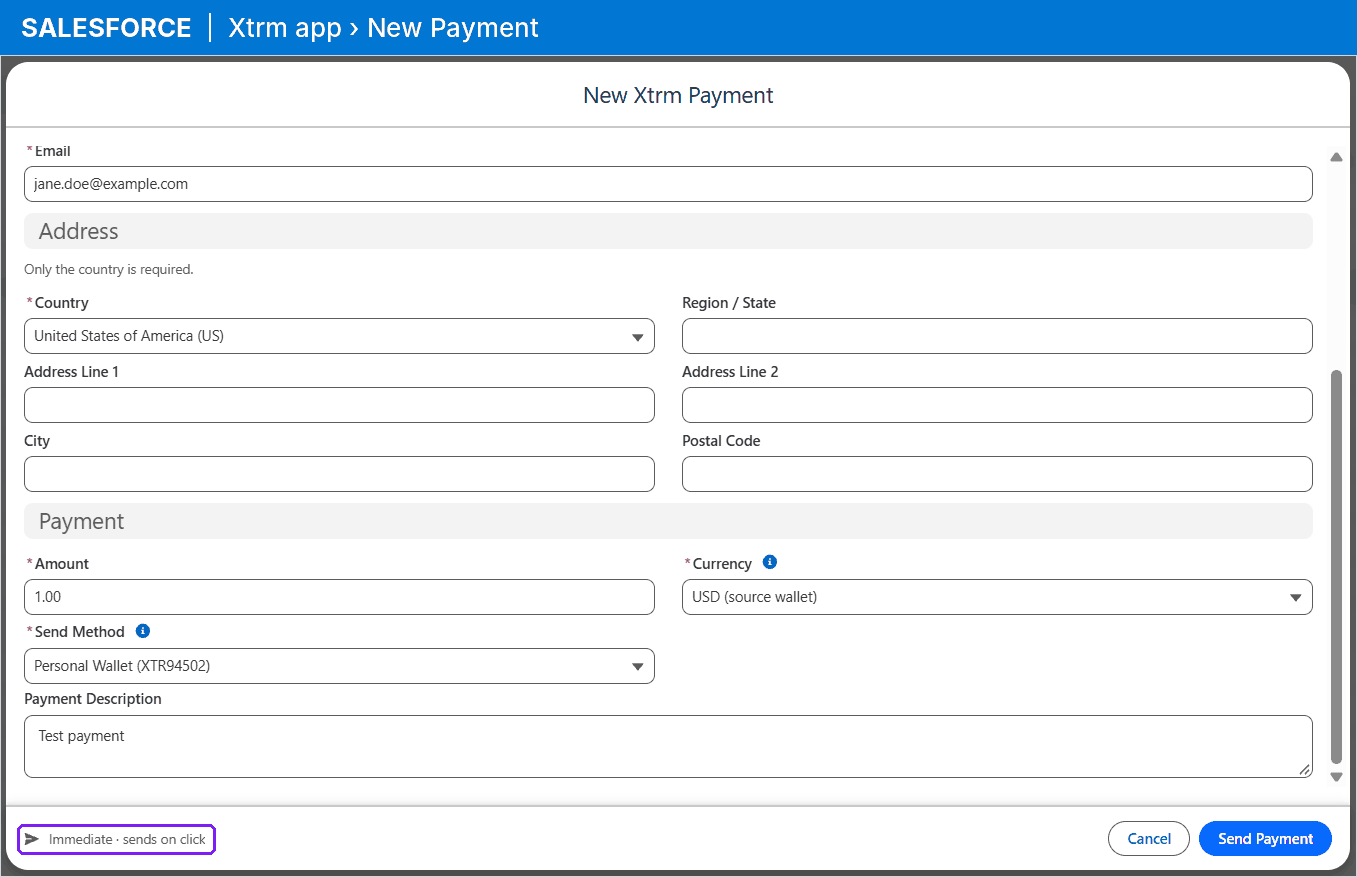
Enter an Amount of 1.00. The footer of the form shows the send mode next to the button, for example Immediate · sends on click. If it shows a warning instead, recheck Step 5.
Click Send Payment. In Scheduled mode the button reads Schedule Payment and the payment waits for the next run.
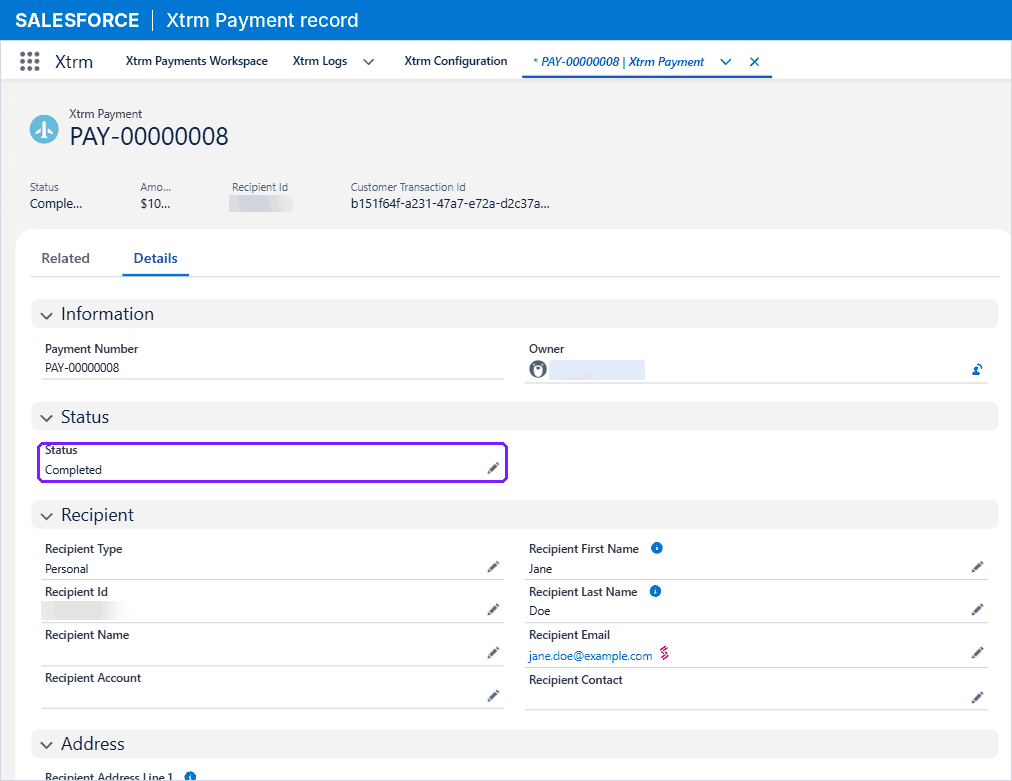
Open the payment record from the list. As Xtrm processes the payment, Salesforce updates its Status: Pending, then Accepted within a minute, then Completed.
If the status is Failed, the Error Code and Error Message on the payment record explain why. Fix the cause and click Retry Payment at the top of the payment record.
Setup is complete. Share SFDC005 - User Guide with the people who will create payments in Salesforce.
Day-to-day admin tasks (in Salesforce)
Send pending payments and refresh statuses by hand
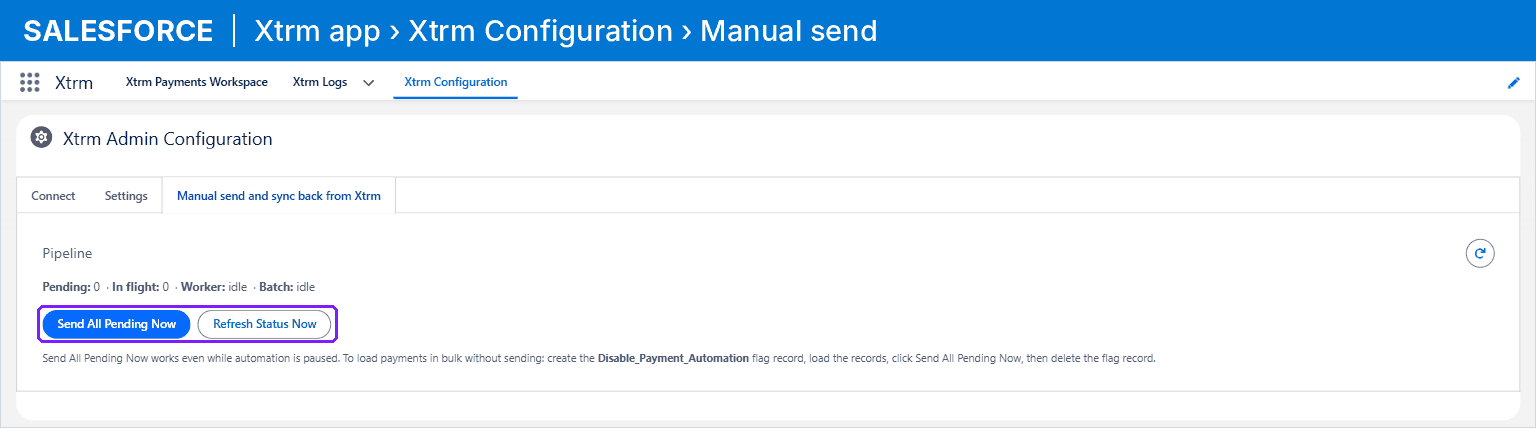
Where: Salesforce, Xtrm app, Xtrm Configuration tab, Manual send and sync back from Xtrm sub-tab. The same two buttons are on the Xtrm Payments Workspace tab.
Send All Pending Now sends every Pending payment from Salesforce to Xtrm now. It works even while sending is paused.
Refresh Status Now pulls the latest status from Xtrm into Salesforce for payments that were already sent.
Pause sending
Where: Salesforce Setup, Custom Metadata Types. Pausing stops Salesforce from sending payments to Xtrm. It doesn't change anything in the Xtrm platform.
You can stop payments from going out without changing the send mode, for example while you load and check a batch. Pausing uses an Xtrm Feature Flag, a custom metadata record in Salesforce.
Go to Setup → Custom Metadata Types and click Manage Records next to Xtrm Feature Flag.
Click New, enter
Disable_Payment_Automationas the Label and the Xtrm Feature Flag Name, and click Save.
While the record exists, payments stay Pending in Salesforce and the payment form footer reads Sending paused · stays Pending. Send All Pending Now still works. To turn sending back on, delete the record.
To load payments in bulk and send them together: create the record, import the payments (Step 8), check them, click Send All Pending Now, then delete the record.
If something goes wrong
A payment failed: open the payment record in Salesforce and read the Error Code and Error Message. Fix the cause and click Retry Payment. SFDC005 lists the common error codes.
The wallet doesn't have enough money: fund it in the Xtrm platform (funding isn't done in Salesforce), then retry the failed payments with Retry Payment, or Retry Selected in the Failed or Rejected view.
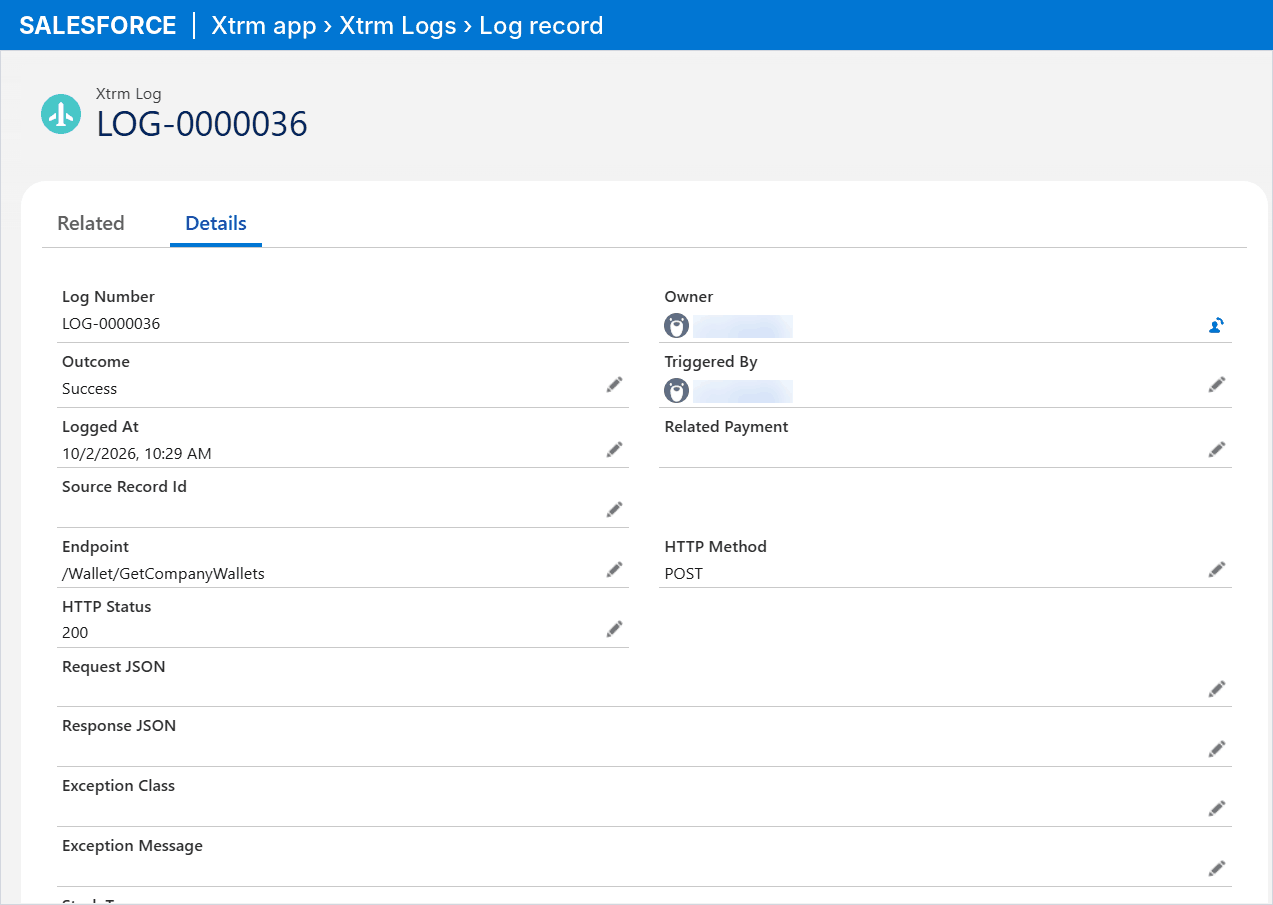
More detail: in Salesforce, open the Xtrm Logs tab and find the rows for that payment. Each log shows the outcome, the Xtrm API endpoint called, the HTTP status, the request and response, any exception message, and the related payment.
Salesforce can't connect to Xtrm: recheck the credentials in the Xtrm platform, and check that Xtrm has approved API access for Salesforce (Part 1).
Still stuck: contact your Xtrm Account Manager or [email protected] with the payment's Error Code, Error Message and log rows.