SFDC005 — Xtrm Payments for Salesforce: User Guide
Last updated: October 13, 2026
TL;DR
You work only in Salesforce, in the Xtrm app. Salesforce sends each payment to Xtrm, Xtrm pays it from your organization's Xtrm wallet, and the status comes back to the payment record.
Funding happens in the Xtrm platform, not in Salesforce. Your organization adds money to its Xtrm wallet there. If a payment fails because the wallet doesn't have enough money, tell your administrator.
To pay someone, click New Payment on Xtrm Payments Workspace (or Create Xtrm Payment on a Contact or Account), choose Personal or Company, fill in the recipient and the amount, and click Send Payment. Recipients don't need an Xtrm account. Xtrm creates one for them.
The footer of the payment form says when the payment goes out.
A payment normally goes Pending, Accepted, Processing, Completed. If one fails, read its Error Message, fix the cause and click Retry Payment.
Don't retry a Pending payment with an
UNCONFIRMED_SENDerror. Ask your administrator to check it in the Xtrm platform first.
Who this guide is for
This guide is for people who create and track payments in Salesforce with Xtrm Payments for Salesforce. Your Salesforce administrator sets the package up first, using SFDC004 - Setup Guide.
Everything in this guide happens in Salesforce, so every screenshot has a blue SALESFORCE label strip. You don't need to log in to the Xtrm platform, your organization's Xtrm account on the web, to make or track a payment. The money moves there, and your recipients see their payments in their own Xtrm accounts.
Funding also happens in the Xtrm platform, not in Salesforce: your organization adds money to its Xtrm wallet there.
To use the Xtrm app you need the Xtrm Payment User or Xtrm Admin permission set, which your Salesforce administrator assigns. If you see "ask your administrator" when you open the payment form, you don't have either one yet.
Where to find it
Open the App Launcher (the grid icon, top left), search for Xtrm, and open the Xtrm app. You'll mostly work in Xtrm Payments Workspace, which lists your payments and has the New Payment button.
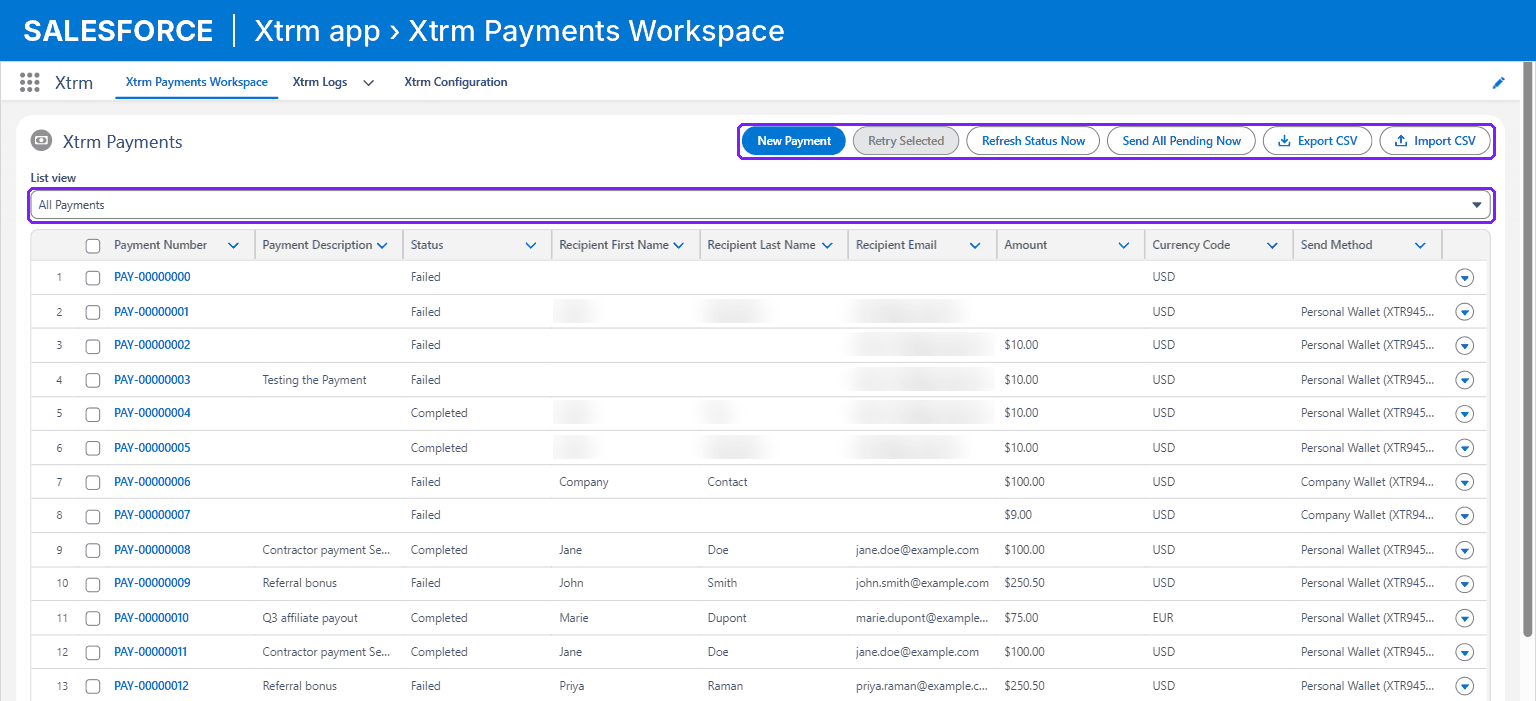
You can also start a payment from a Contact or Account record with the Create Xtrm Payment button, if your administrator has added it to the page.

Make a payment
Click New Payment on the workspace, or Create Xtrm Payment on a Contact or Account.
Under Who are you paying? choose Personal to pay a person, or Company to pay a business.
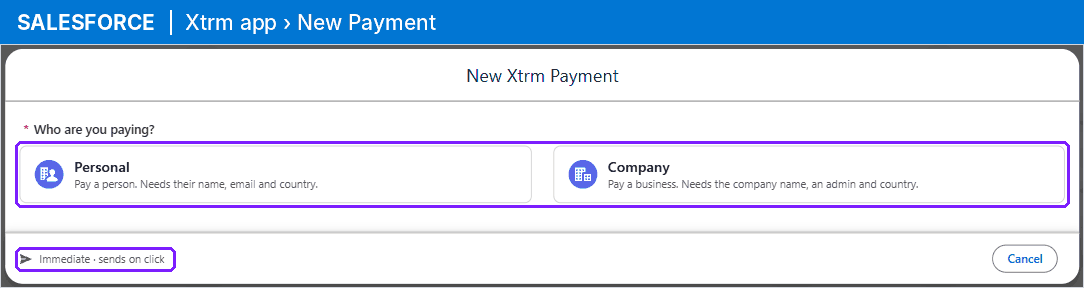
Fill in the recipient (see Paying a person and Paying a business below).
Under Payment, enter:
Amount: at least 0.01, at most two decimal places.
Currency: filled in for you, marked (source wallet). Leave it as is. Every payment is paid from your organization's source wallet in Xtrm, in that wallet's currency, and a payment in any other currency is stopped before it is sent.
Send Method: Personal Wallet or Company Wallet pays into the recipient's Xtrm wallet. Bank Transfer pays the bank account the recipient has linked in their Xtrm account. If they haven't linked one, the payment fails and says so.
Payment Description (optional): the recipient sees this in their Xtrm account.
Check the note in the footer, next to the button. It tells you when the payment will go out (see When does the payment go out? below).
Click Send Payment, or Schedule Payment if your organization sends payments on a schedule.
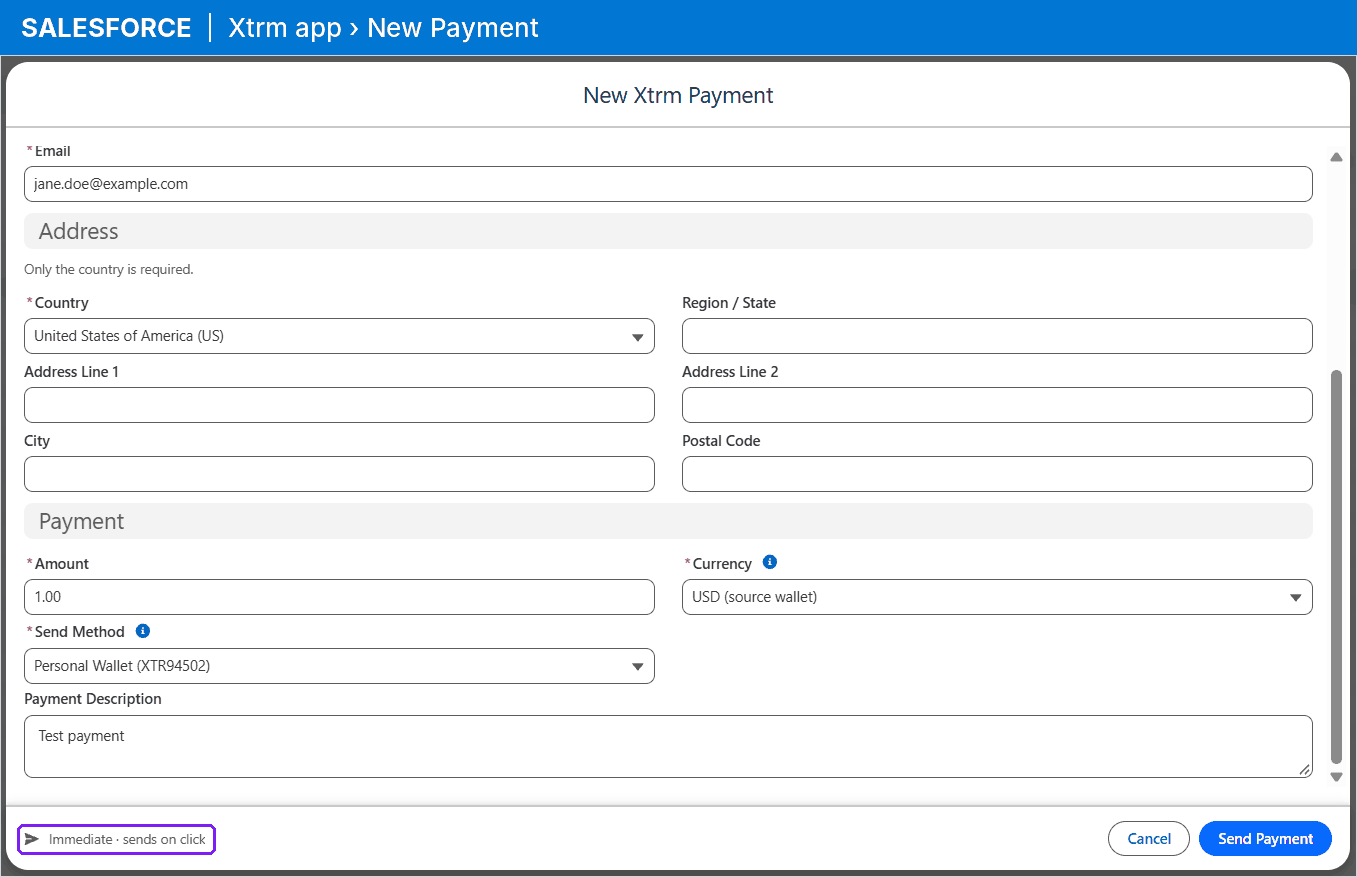
When it's done you can View Payment, start another payment, or click Done.
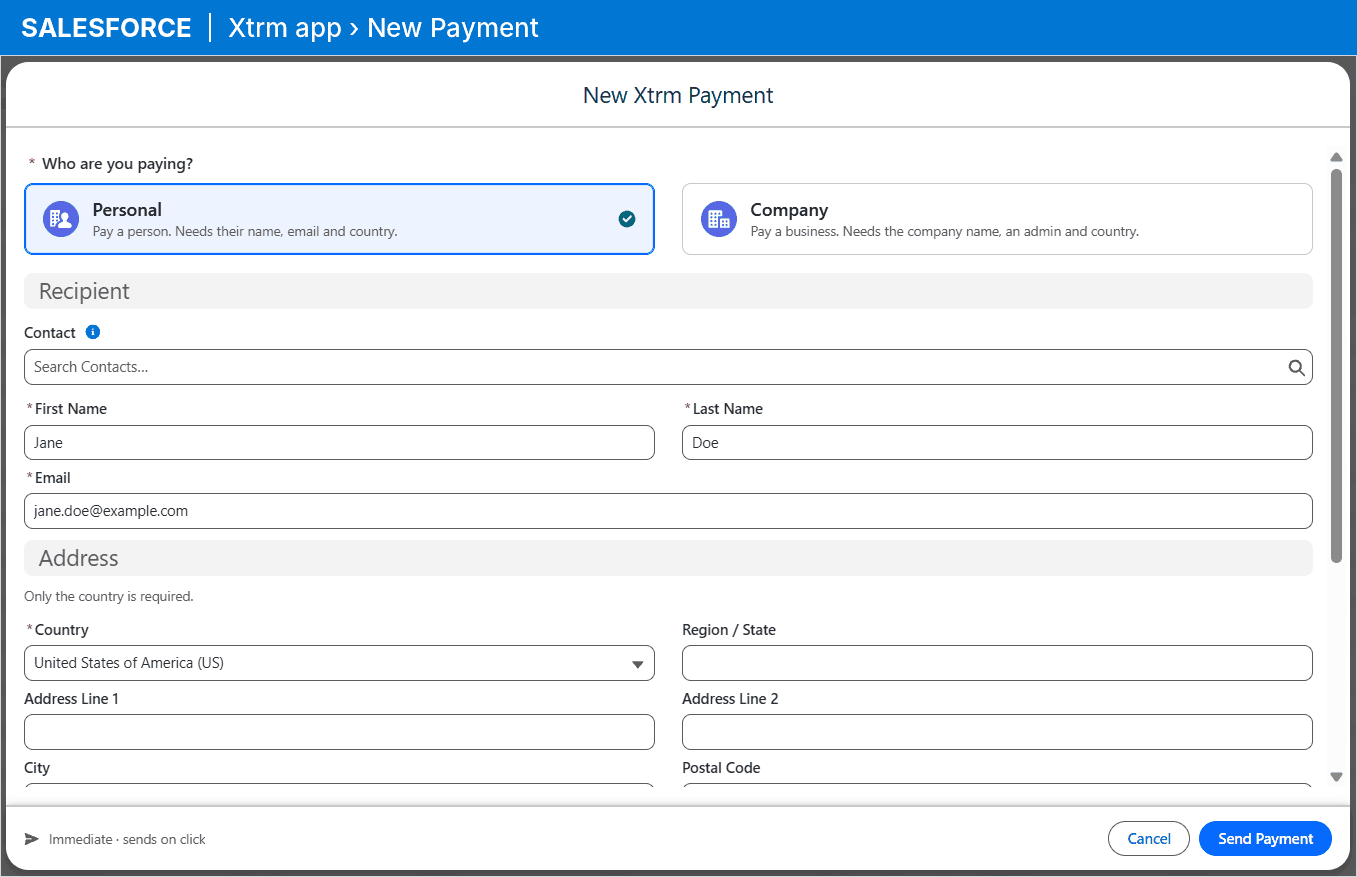
Paying a person (Personal)
You need the person's First Name, Last Name, Email and Country. The address is optional.
Contact (optional): pick a Contact and the form fills in their details. The payment always goes to that Contact's email, so you can't edit the email field.
Starting from a Contact record: the Contact is already picked and its details are filled in.
The recipient doesn't need an Xtrm account. If they don't have one, Xtrm creates one for them. Later payments to the same person go to the same account.
Paying a business (Company)
You need the Company Name, the Country, and a Company admin: the person Xtrm sets up the company's Xtrm account for (Admin First Name, Admin Last Name, Admin Email). The website and address are optional.
Account (optional): pick an Account and the form fills in the company name, website and address. You still enter the company admin yourself.
Starting from an Account record: the Account is already picked and its details are filled in.
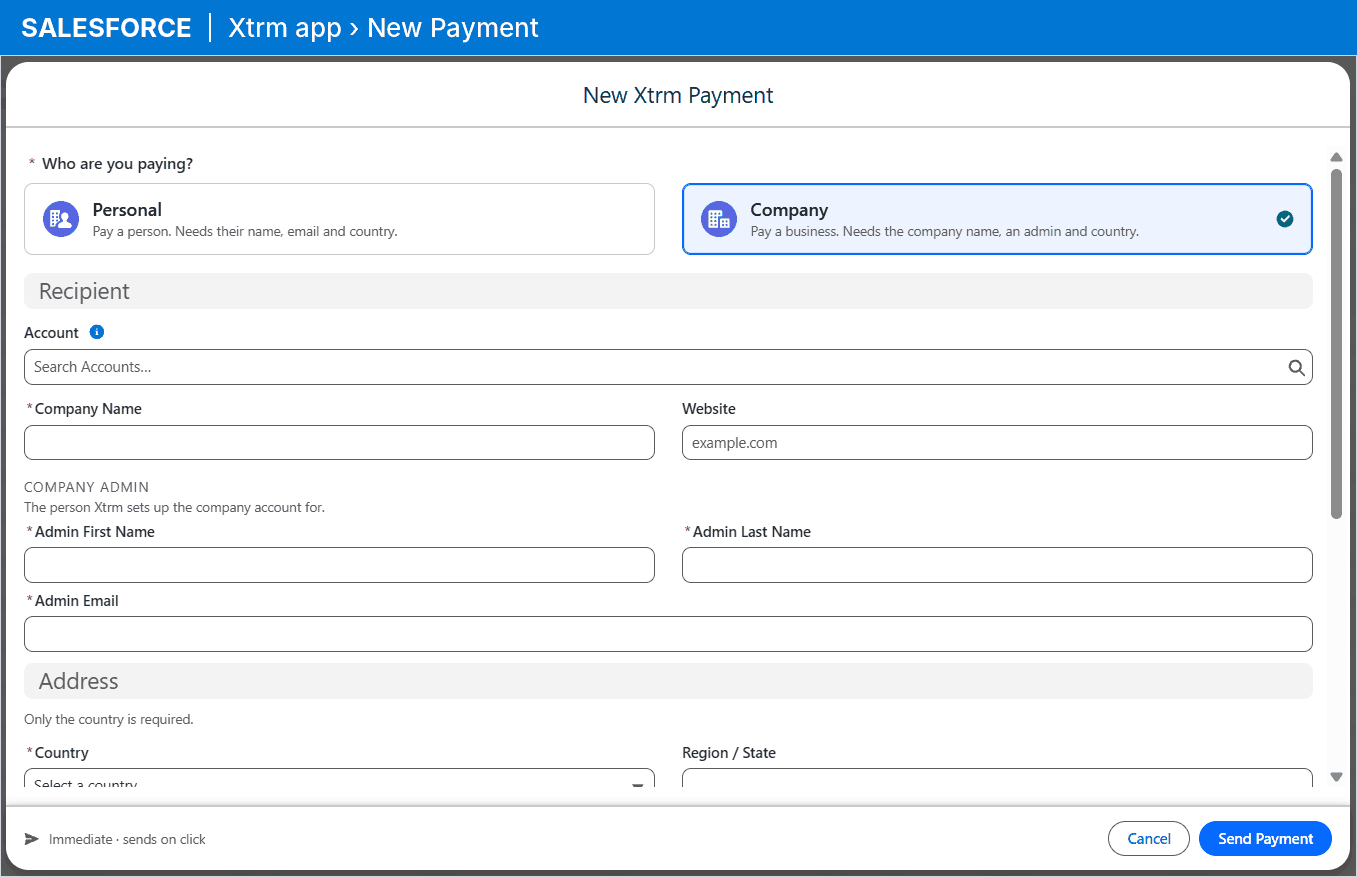
If you pick a different Contact or Account, the form clears what the first one filled in before it copies in the new one.
When does the payment go out?
Your administrator chooses one of two send modes in the Xtrm app. The footer of the payment form tells you which one is on.
Footer says | What happens |
|---|---|
Immediate · sends on click | Salesforce sends the payment to Xtrm as soon as you click Send Payment. |
Scheduled · next run (day and time) | The payment waits in Salesforce as Pending and goes to Xtrm with the next scheduled run. |
Scheduled · no run set up | The payment waits as Pending, but no run is scheduled. Ask your administrator to set one up. |
Sending paused · stays Pending | Your administrator has paused sending. The payment waits as Pending until they send it. |
Track your payments
List views
Use the List view picker at the top of Xtrm Payments Workspace to switch views:
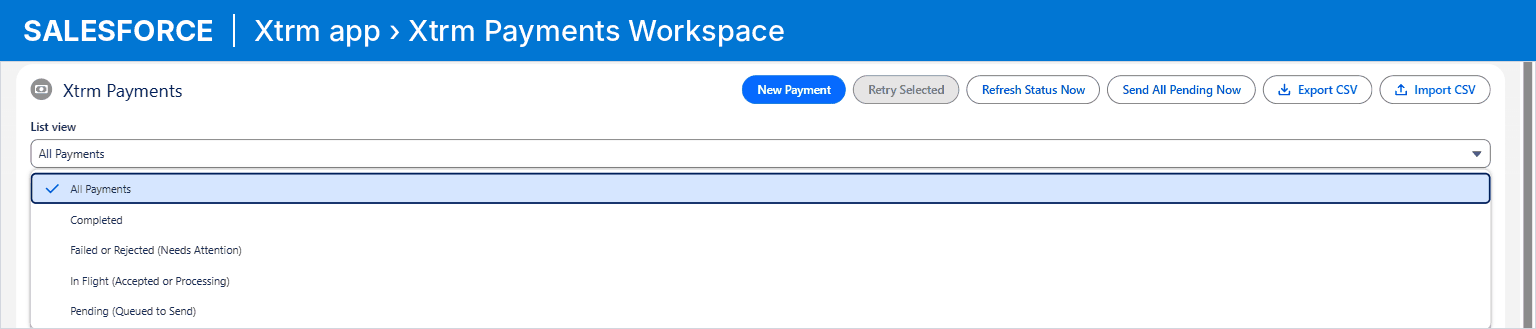
View | Shows |
|---|---|
All Payments | Everything |
Pending (Queued to Send) | Payments waiting to go to Xtrm |
In Flight (Accepted or Processing) | Payments Xtrm is working on |
Completed | Paid |
Failed or Rejected (Needs Attention) | Payments that need someone to look at them |
Click a Payment Number to open the payment. Refresh Status Now on the workspace pulls the latest status from Xtrm into Salesforce for payments that were already sent.
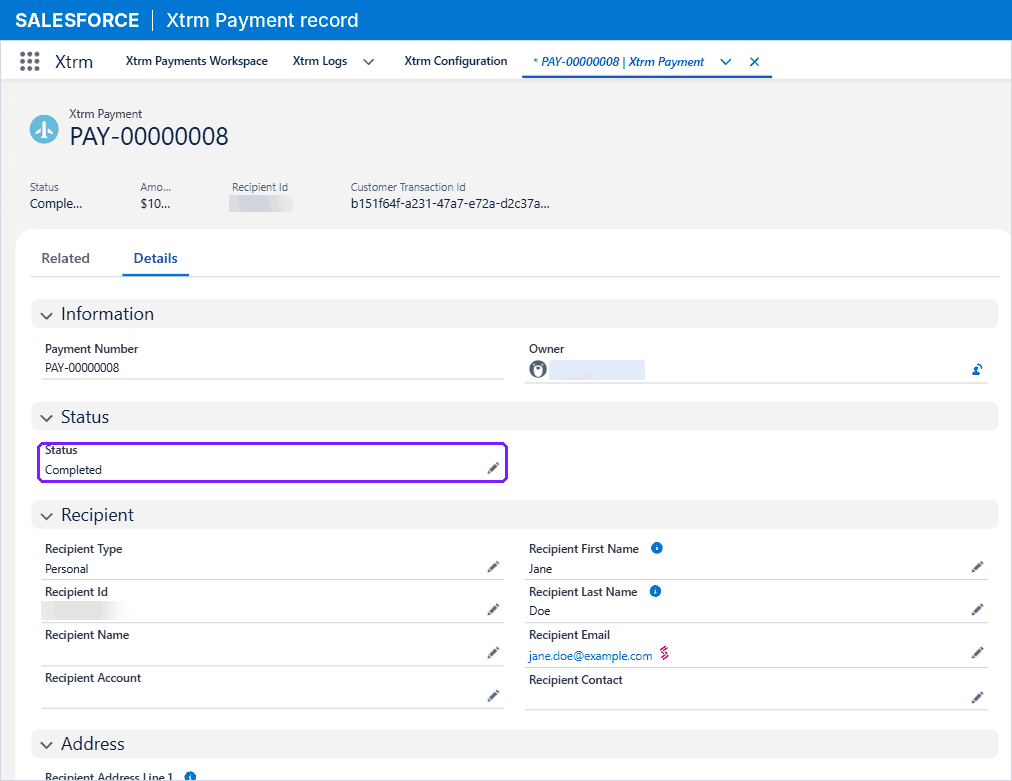
What each status means
A payment normally goes Pending → Accepted → Processing → Completed. In Immediate mode that usually takes a few minutes.
Status | Meaning |
|---|---|
Pending | Waiting in Salesforce to be sent to Xtrm. |
Accepted | Xtrm has received the payment. |
Processing | Xtrm is paying it. |
Completed | Paid. |
Failed | Something stopped the payment. The Error Code and Error Message on the payment say why. |
Rejected | Xtrm turned the payment down after accepting it. |
Cancelled | Someone put the payment on hold before it was sent. |
Fix a failed payment
Open the payment and read the Error Message.
Fix the cause. The common ones are in the table below.
Error Code | What to do |
|---|---|
| A required value is missing or wrong. The message names it. Edit the payment and fill it in. |
| More than one Xtrm account matched the recipient, and Xtrm never guesses. Put the right account number (it starts with |
| Xtrm couldn't create the recipient's Xtrm account. Check the recipient's details, or ask your administrator to look in Xtrm Logs. |
A message about the send limit or balance | The problem is in your organization's Xtrm account, for example a wallet that needs more money. Wallets are funded in the Xtrm platform, not in Salesforce, so tell your administrator. Retry the payment once the wallet is funded. |
A message about a missing bank | The recipient hasn't linked a bank account in their Xtrm account. Ask them to link one, or change Send Method to the wallet option. |
Click Retry Payment at the top of the payment. If you don't see it, ask your administrator to add it (SFDC004, Step 7). To retry several at once, tick them in the Failed or Rejected view and click Retry Selected.
A retry sends the payment again to the same recipient account. It doesn't create a new account.
A Pending payment with an UNCONFIRMED_SEND error
This isn't a failure. Xtrm accepted the batch the payment was in but didn't confirm this payment either way, so Salesforce can't tell whether the money moved. Don't retry it. Ask your administrator to check the batch in the Xtrm platform before it is sent again.
Hold or cancel a payment
While a payment is still Pending, you can stop it from being sent: edit the payment and set Status to Cancelled. To release it later, set it back to Pending.
Once a payment is Accepted, Processing or Completed, you can't change its status. It may already be on its way, and changing it could pay the recipient twice.
Pay many people at once (CSV import)
Importing uses Salesforce's own Data Import Wizard, the standard import tool built into every Salesforce org. Xtrm doesn't add an importer of its own.
You need the Import Custom Objects permission for this. If you don't see Import CSV on the workspace, ask your administrator.
On Xtrm Payments Workspace, pick a list view with no payments in it (for example Pending) and click Export CSV. You get a file with just the column headers. That's your template.
Fill in one row per payment:
Every row: Recipient Type (
PersonalorCompany), first and last name, email, Recipient Country (ISO2) (two letters, for exampleUS), Amount and Send Method (XTR94502for a person,XTR94504for a company,XTR94500for a bank transfer).Company rows also need Recipient Name (the company name).
Currency must match your organization's source wallet currency.
If the recipient already has an Xtrm account, you can put it in Recipient Id instead of the name and email.
Click Import CSV. This opens the Data Import Wizard. Choose Custom objects → Xtrm Payments → Add new records, upload the file and start the import.
Rows with missing values are rejected, and the message says what's missing. Imported payments go out the same way as any other payment, following the send mode.
Export CSV also works on any list view with payments in it. It downloads every payment in that view, not just the ones on screen.
Payments on Contacts and Accounts
If your administrator has added them to the page, a Contact or Account shows:
Xtrm Payments (Recipient): every payment to that Contact or Account.
Account Number: their Xtrm account number. It is filled in from Xtrm after the first payment.
Getting help
Send your administrator the payment's Payment Number, Error Code and Error Message. They can see the full history in the Xtrm Logs tab in Salesforce, and can reach Xtrm at [email protected].