COMPANY003 — How to Link a Bank Account
Last updated: October 7, 2026
Companies with balances in their Xtrm digital wallets can transfer funds to bank accounts worldwide. Xtrm allows you to link up to 75 bank accounts per company entity to transfer funds directly from your wallet to your local or international bank.
Security Notice: Linking a bank account for outbound transfers does not give Xtrm authorization to pull or withdraw funds from your bank account. Linked accounts are strictly used for transferring funds out of your Xtrm digital wallet.
Step-by-Step Instructions
Access Bank Settings
Log in to your Xtrm Company Account at www.xtrm.com.
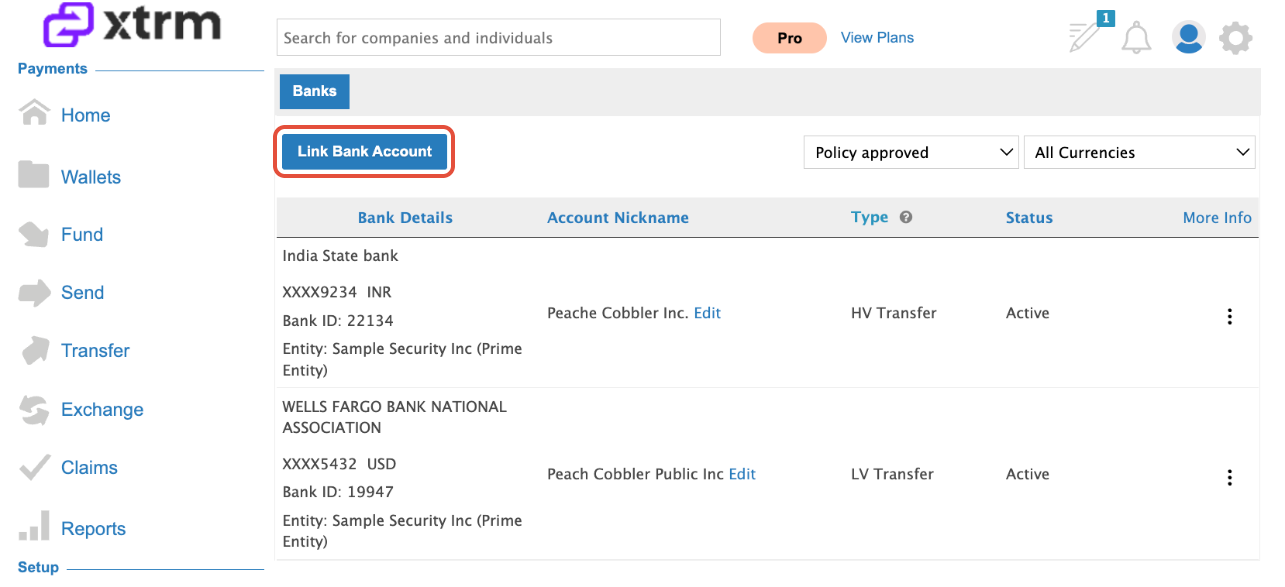
From the left-hand main menu, select Banks.
Click Link Bank Account.
Select the Transfer Direction
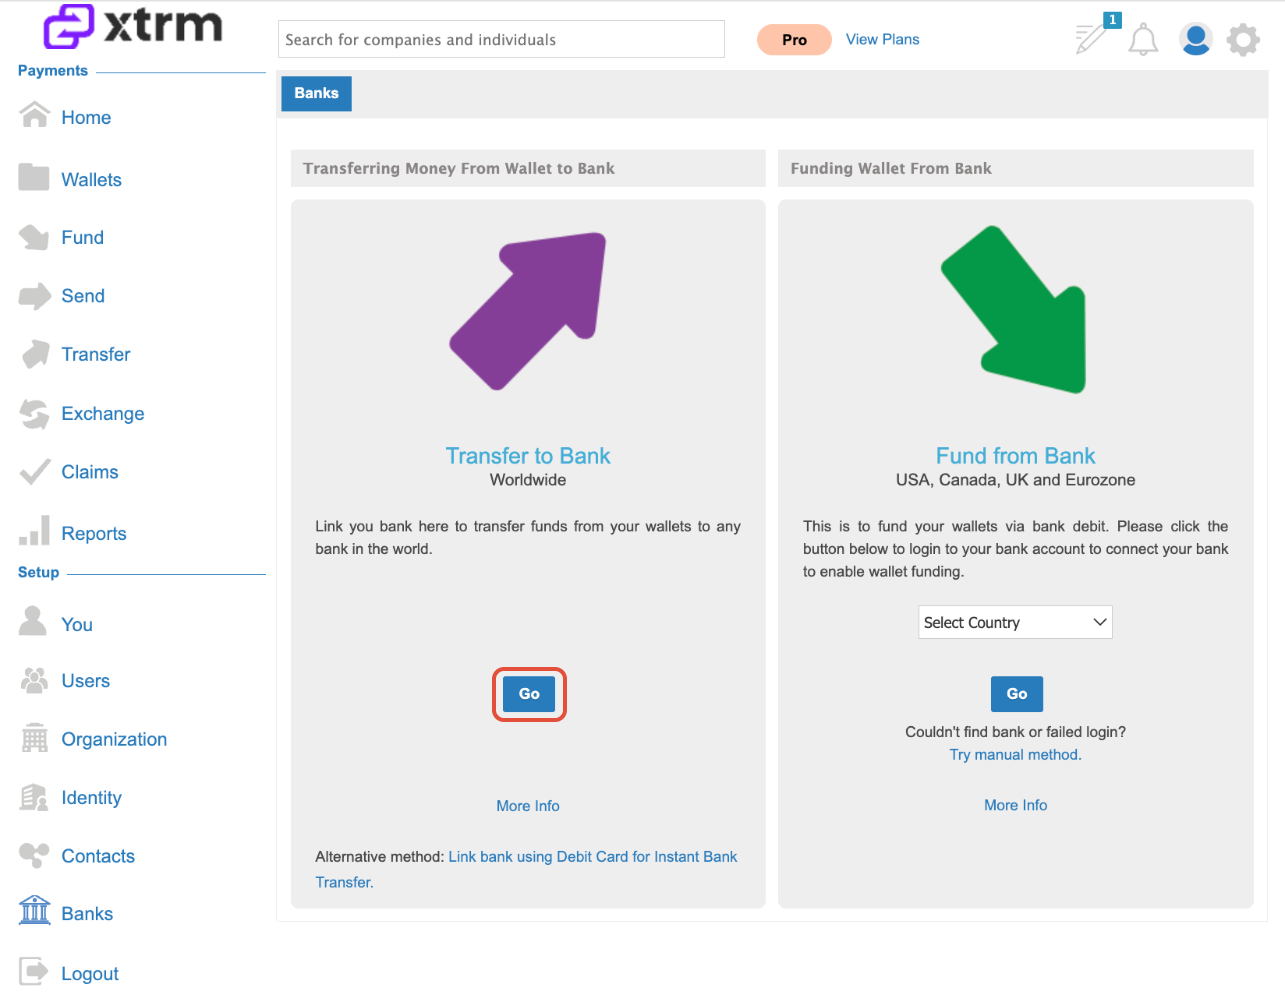
Choose Transfer to Bank (used for moving funds from your Xtrm wallet to your bank account).
Click Go to continue.
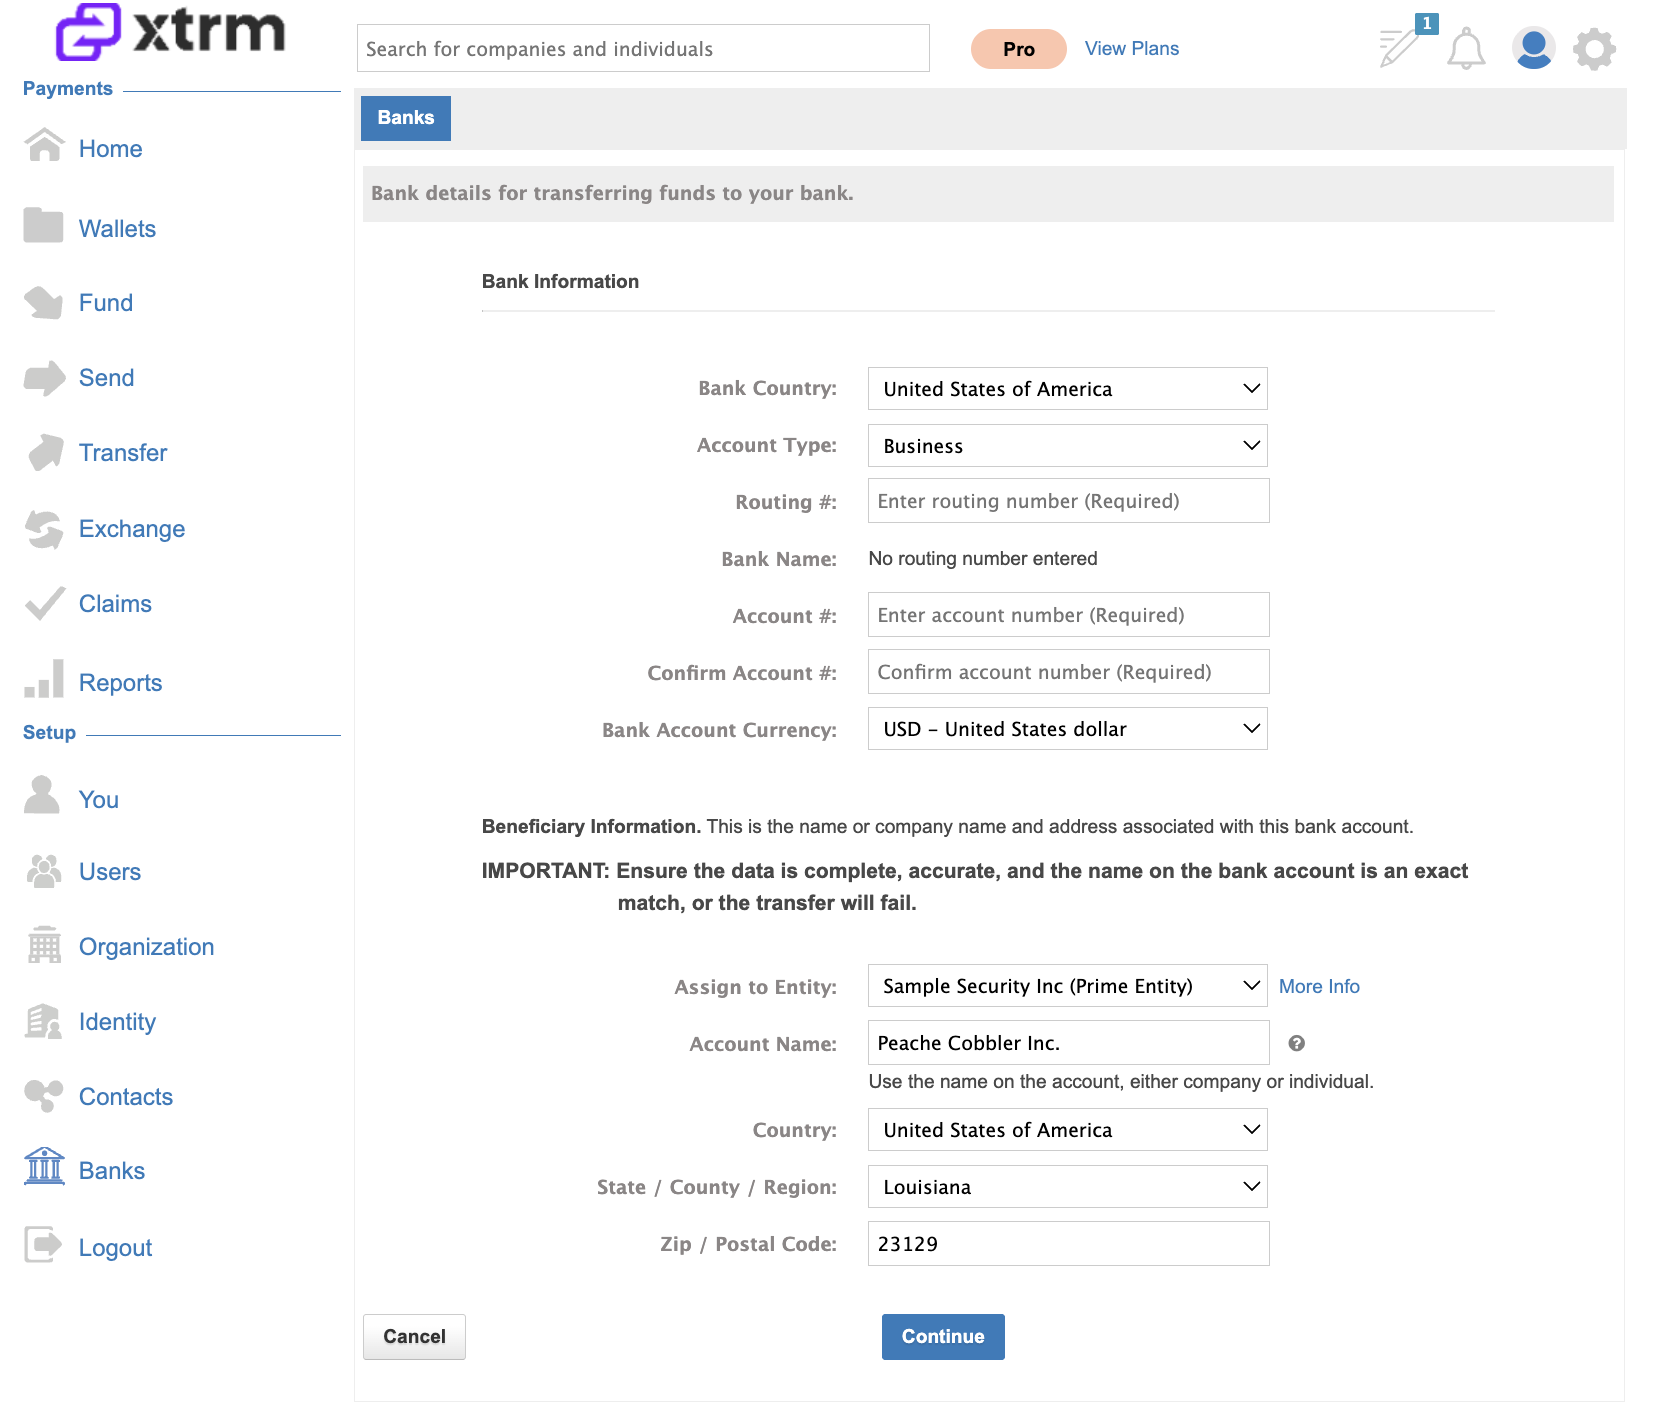
Select Country & Confirm Account Currency
Bank linking is country-specific. Ensure the currency you select matches the actual base currency of your bank account to avoid transaction rejections or return fees.
Select the Country where your bank account is located.
Verify and set the Currency:
The platform will automatically preselect the primary currency for the chosen country.
Important: If your bank account operates in a different currency than the default, you must change the dropdown to match the account's target currency. Linking under the incorrect currency will result in bank payment returns and potential return processing fees.
Fill out the required primary fields and click Continue.
Fixing an Incorrectly Linked Bank Account
If you've already linked a bank account with the wrong currency, such as adding a UK GBP account as USD, you'll need to delete and re-add it:
Delete the existing bank link that was added with the incorrect currency.
Re-add the bank account with the correct country and local currency.
Ensure you use the exact account name and number.
Re-initiate the transfer to the correctly configured bank account.
Provide Region-Specific Banking Details
Depending on the bank location and currency chosen, you will be prompted to provide local routing details. Common requirements include:
Important: When entering beneficiary information, always use the account holder's name and residential address (your own information), not the bank's details. The beneficiary is the person who owns the account. The beneficiary name and address you provide must exactly match what is on file with your bank account, or the transfer will fail. Ensure your legal name and the address associated with your bank account are entered precisely.
Additional beneficiary address guidance: If your bank documentation provides only the bank's physical address and does not include a separate beneficiary or account holder address, which may occur with banks such as Grey or Clear Junction, use the bank's address in the beneficiary information fields. Do not use a PO Box. Enter the address in the appropriate fields:
Address Line 1: Street address
City: City name
Postal code: Postal or ZIP code
Country: The bank's country
United States (USD)
For U.S. bank accounts, you'll need to provide:
Routing number: Your bank's 9-digit routing number.
Account number: Your full account number.
Beneficiary information: Use your legal name (the account holder) and your U.S. residential address on file for that account—not the bank's name or address. The beneficiary is the person who owns the account. The name and address must exactly match what is on file with your bank account, or the transfer will fail.
Review all details for exact matches before continuing.
Canada (CAD)
For Canadian bank accounts holding CAD, use Direct Deposit / EFT information with the following formatting requirements:
Routing/bank code: Use 9 digits formatted as a leading 0, followed by your 3-digit institution number and 5-digit branch transit number. For example, institution 004 with transit 44401 becomes
000444401.Account number: Use 11 digits formatted as the first 4 digits of your transit number followed by your 7-digit account number. For example, transit 44401 becomes
4440followed by your account number.SWIFT/BIC: This is not required for CAD accounts.
Non-standard account numbers: If your Canadian account number is not 7 digits, do not try to pad it yourself. Instead, send a void cheque or the top portion of a bank statement with sensitive information masked to Support. They will confirm the exact values or link the account for you.
Transit number validation errors: If you receive an error message stating "transit number isn't valid" when linking your Canadian bank account, contact Support with a copy of your void cheque and your PAT number. Support will set up the account on your behalf.
EFT vs Wire transfers: When linking a Canadian bank account for transfers from a US wallet, use your Canadian bank's local EFT fields for low-value transfers, or wire fields if the payout is sent as an international wire. Local EFT typically uses the institution number, transit or branch code, and account number. Wires use a SWIFT/BIC and a wire account format. Confirm in the transfer flow whether the payout method is Low Value (EFT) or High Value (wire), then enter the matching details from your bank's Direct Deposit/EFT form or Wire Instructions.
Region / System | Required Routing Identifiers |
United States | ABA Routing Number, Account Number, Account Type (Checking/Savings) |
India | IFSC Code, Account Number, Account Type |
Europe & UK | IBAN, SWIFT/BIC Code |
Canada | Financial Institution Number, Transit/Branch Code, Account Number |
International / Other | SWIFT/BIC Code, Local Branch/Bank Code, National ID (if applicable) |
Tip: Double-check all numbers and letters before submitting.
Linking Business Bank Accounts
If you need to link a business bank account from a personal profile, split the legal company name across the First Name and Last Name fields. For example, Acme Solution Inc. would be entered as First Name: Acme Solutions, Last Name: Inc. The beneficiary name must match exactly what your bank has on file.
Understanding Transfer Methods & Fees
Once your bank account is linked, you can select from two available payout methods depending on speed and value requirements:
1. Low Value Transfer (LV)
Networks Used: Local payment networks such as ACH (US), EFT (Canada), SEPA (Europe), or NEFT/IMPS (India).
Transfer Fee: $0 / No fee.
Best For: Standard transfers routed in the country's local currency.
2. High Value Transfer (HV)
Networks Used: International Wire / SWIFT networks.
Transfer Fee: Up to $10 USD (or local currency equivalent) for local high-value wires. A $20 USD fee applies if linking a non-local currency bank account.
Best For: Priority wire transfers or cross-border payouts in non-domestic currencies.
How to Initiate a Transfer to a Linked Bank
After linking your bank account successfully:
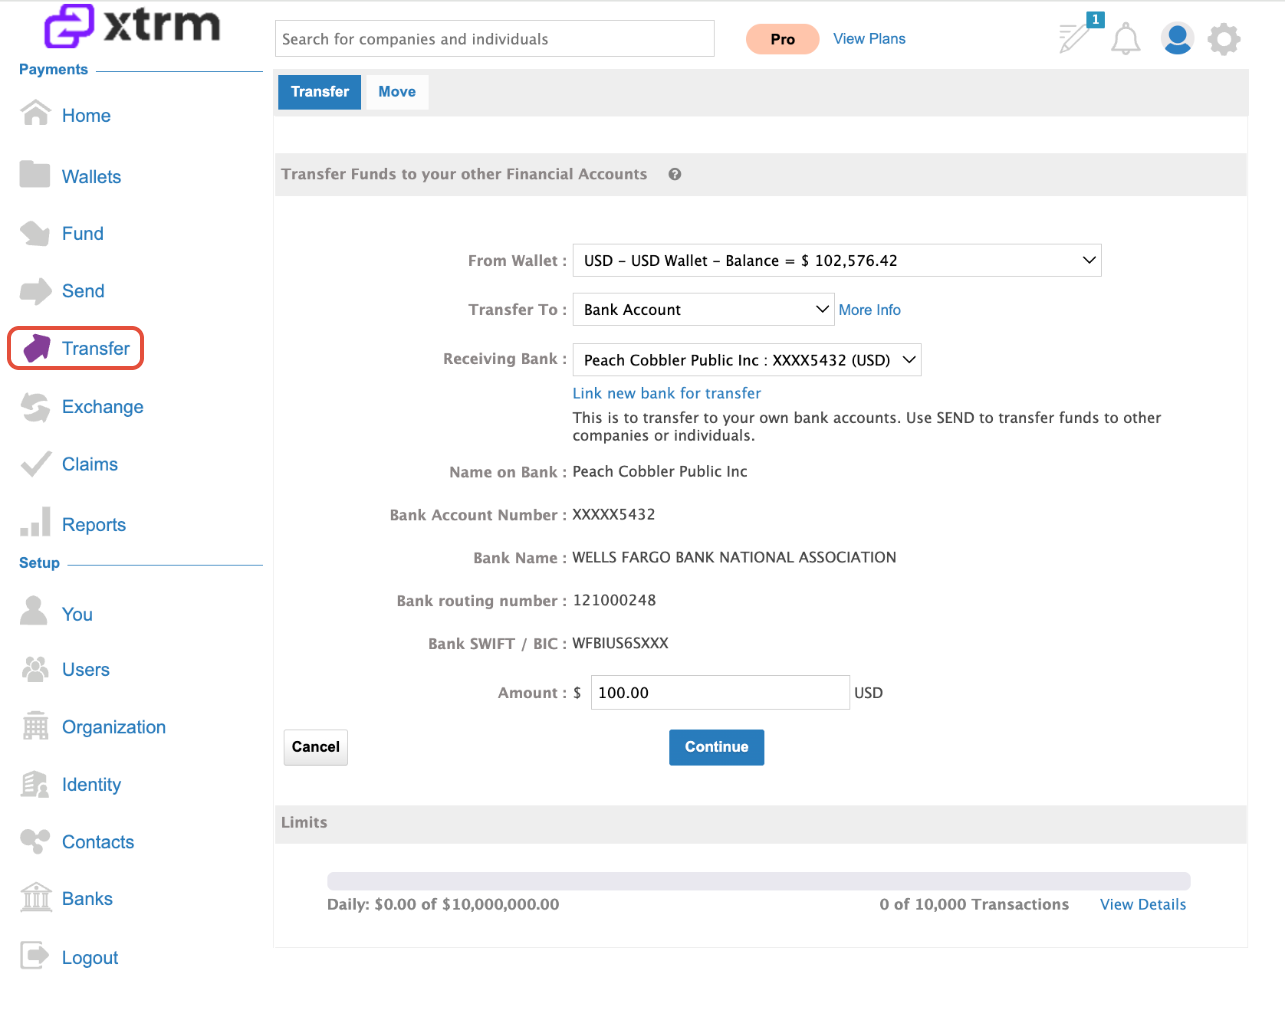
Click Transfer Funds from the bank confirmation screen, or click the Transfer icon in the left-hand navigation menu.
Select the originating Xtrm Wallet and your newly linked target bank account.
Enter the transfer amount and confirm the transaction.